


A Noob's Guide to Github Actions
10 Feb 2022
I have a few Rmarkdown scripts that I’ve created to visualize data for forecasting. I host them on Github so they appear as html pages on my website. I’ve been looking for a way to automatically render those Rmarkdown files every day instead of manually running and uploading the updated html file to Github, and someone suggested I try Github Actions. This turned out to be the perfect solution, but it took a lot of head scratching and confusion on my part to get it going. So here I’m documenting in detail everything I learned from the perspective of a novice muddling through it. There are other guides out there from people who have more knowledge of Github, Github Actions, and R, but as I looked at these guides I felt that there were gaps where they were either discussing things above my level of understanding or things didn’t apply to my situation. I’m hoping that by documenting what I’ve learned here it will help other noobs learn and setup their own Github Actions more quickly, and also that I’ll be able to use this guide myself when I inevitably forget how my setup works.
References and Helpful Sources
Before digging in, a few things are worth mentioning and linking up front so they can be referred to. First are the guides I used to piece this all together. I’ve included a TL;DR as well, if the TL;DR sounds like it fits perfectly with what you need to do feel free to jump on over and ignore everything else I have to say.
- Source: Running R Scripts on a Schedule with GitHub Actions
- TL;DR: A great overview of all the steps of creating an R script, putting it into a package, uploading the package to Github, and creating a Github action to schedule it. It gave me a great starting point but it was too light on explanation, didn’t really specify what was actually happening at a basic level, and used a procedure that at the end I felt was more complicated than I needed.
- Source: Rendering your README with GitHub Actions
- TL;DR: This one is based around creating an Rmarkdown file that will be used to update the README in their Github repository automatically. This one filled in a few more pieces about syntax and helpfully describes what’s happening in certain parts of the process, but there were still parts that I didn’t understand, background I felt like I was missing, and it didn’t give me all the information I needed to complete my Github Action.
- Source: R-lib Actions
- TL;DR: A Github repository with a bunch of actions and examples for using Github Actions to run R scripts and files. This one was particularly useful for figuring out syntax or what specific commands were doing, but it’s somewhat light on descriptions so is mostly useful for templates and added context.
- TL;DR: A Github repository with a bunch of actions and examples for using Github Actions to run R scripts and files. This one was particularly useful for figuring out syntax or what specific commands were doing, but it’s somewhat light on descriptions so is mostly useful for templates and added context.
Those are the main sources of useful information related to Github Actions I found. But there are some additional helpful tools and sources I’ve mentioned in the following guide that I’ll link here. These might be meaningless to anyone reading this who isn’t familiar with this stuff, but I think it will be useful to have some of the more important links up front and all in one place for referring back to later.
- Cron scheduling tools
- A tool that helps explain Cron syntax and can generate Cron expressions
- Another one, similar to above. I prefer the one above but this one may be helpful too.
- Creating an R package. I ultimately didn’t end up using any of these. They’re more in-depth than is necessary to make a simple Github Action that runs R code. But I found all these when trying to figure out what an R package was in the first place and I’ll provide them in case anyone needs a more advanced understanding of R packages for their use.
- A useful explainer on different types of R packages. I wish I had found this earlier, because it seems like people commonly refer to R packages without explaining what type they mean or what an R package actually is.
- Making Your First R Package
- Developing Packages with the RStudio IDE
- Instructions for Creating Your Own R Package (pdf)
- Putting your R package on GitHub
- Miscellaneous stuff I found useful
- Explainshell.com this is handy for understanding what the shell commands used in the Github Actions .yaml file actually mean.
- Download a Github file or folder. Super useful since Github can be a bit of a pain to work with on the web (and I’m too ignorant/lazy to try to figure out Git). You just simply paste the address of the Github repository, folder, or file you want into that website and it’ll create a download for you.
- Path syntax explainer on Stack Overflow. A helpful explainer on Stack Overflow of how you can create a path to root, parent, and current directories using “/” , “./”, or “../”.
- Github Actions documentation. Extremely helpful for looking up commands, syntax, and available options. Entries give really good explanations of what’s actually happening and what options are available to you.
- My Github workflows. That’s a link to my Workflows folder containing the .yaml files that are my Github Actions. This may be handy if you want to follow along with an existing example.
First Step - Making a Simple Package
Once you have an R file you want to regularly run using Github Actions, whether it’s a script or an Rmarkdown document, the first thing you need to do is make a package. This is simpler than it might sound. There are several different package formats, but we only care about the simplest one. It’s essentially your R file placed in a folder with a few other basic files nearby. You make a folder, name it what you want your package name to be, and the inside of that folder will end up looking like this:
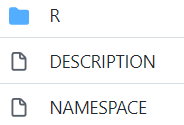
Your R script or Rmarkdown file will go inside the “R” folder shown. The DESCRIPTION and NAMESPACE files just contain information about the package. We probably don’t even need the NAMESPACE file, but it doesn’t hurt to keep it either. We do need the DESCRIPTION file though, because we’ll use that for telling our Github Action what packages our R code needs.
To build your package you can either just manually create or copy the folder structure I’ve shown, or follow one of the procedures to generate a package I linked in the references section above. I recommend just copying and editing, feel free to download and copy my files (you can use the Github directory downloader I mentioned in the references section to download them).
The DESCRIPTION and NAMESPACE files can be edited as text documents in Notepad or your preferred text editor. One of my DESCRIPTION files looks like this:
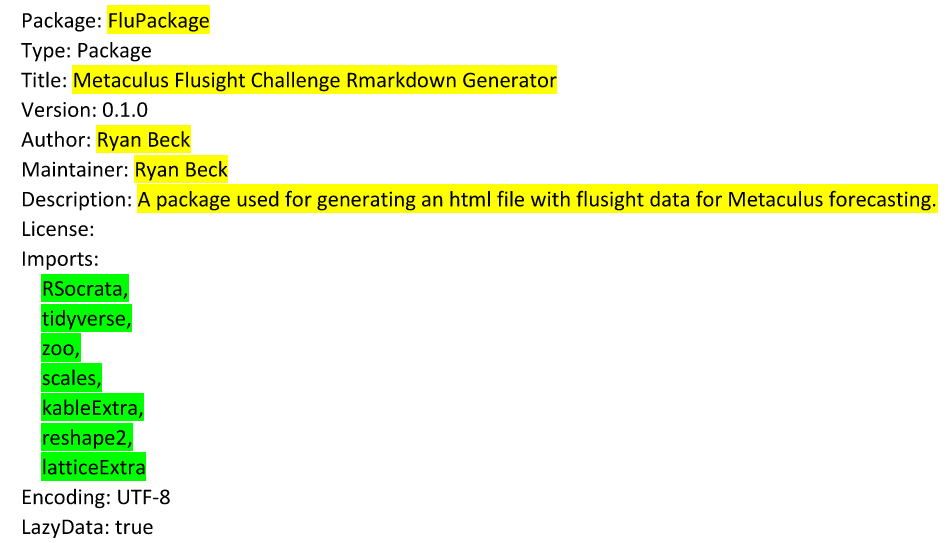
You can edit the yellow highlighted information as you please, that’s just stuff that’s supposed to be information if someone else were to use or look at the package. The “Package” line should be changed to the name of the folder you put the DESCRIPTION and NAMESPACE files and “R” folder in because that’s the name of your package. The green highlighted lines under imports is what we really care about. We’re going to reference this stuff in our Github Action to tell Github what packages it needs to load to run our R file. Anything you call in your R script or Rmarkdown document with library() (e.g. library(tidyverse)), should go here. Otherwise you won’t have the proper libraries loaded to run your script.
Once you’re done editing the DESCRIPTION file you can save it as a .txt file and then rename it to delete the .txt extension. The NAMESPACE file in my packages just contains this: exportPattern(“^[[:alpha:]]+”). I don’t know what that means or what that does. According to this it’s just something that helps R packages talk to each other. The text in that file was just what was there when I generated a package in RStudio. I don’t think we really need the file, but it doesn’t seem to be hurting anything either so I left it there.
Side note: When creating a typical R package for others to use, you’re generally not supposed to leave library() calls in your R script. It sounds like this can create errors for package users. However, I don’t think we care about this because our intent isn’t to distribute the package for others to use, we just want to put our R file in a package so it will be run automatically. If you intend to create a more traditional R package for distribution and others to use you probably need to take a deeper look at whether you’re following the appropriate best practices.
Once the files are edited, your package folder is named appropriately, and your R file is placed in the “R” folder the next step is to upload the package to Github. Just place it wherever in your Github repository you like.
Create a .Github/Workflows Directory
Make a new folder called “.Github” in the root directory of your repository. It has to be in the root, otherwise it won’t work. Then in the “.Github” folder make a folder called “Workflows”. This is where the .yaml files that define the workflows to be completed automatically will go. You can see the .Github/Workflows directory in my repository for an example.
Create a Github Action
Next we’ll create the .yaml file that will define the Github Action. I’ll walk line by line through mine and try to explain my understanding of what each is doing.
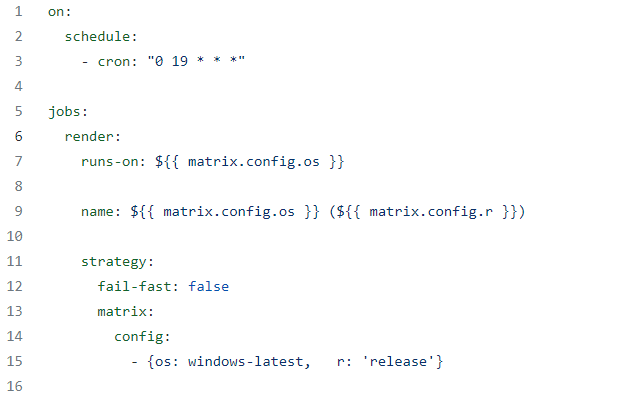
First up, line 1. The “on:” line tells Github what will trigger the action. There are multiple ways to trigger your action, such as by looking for a recent push to your repository or many other types of events. Mine is using a schedule, which runs at specified intervals based on cron syntax. My lines 1 through 3 tell the Github Action to trigger at 7 PM every day (in UTC, the timezone used on Github). You can tell it to run at time intervals instead if you want, such as by entering “*/10 * * * *” which would tell it to run every ten minutes (the most frequent Github allows is every 5 minutes).
At line 5 I define a job. Each Github Action can have multiple jobs if you want, and the jobs will run in parallel (at the same time) if you define more than one. Line 6 is just what I’ve decided to call this job. Instead of “render’ you can put anything you want there, like “create-pizza-order” or whatever you want to describe your job as. Line 7 defines what Github runner will be used. But instead of directly defining it on this line the “${{“ syntax means it’s referring to a variable defined elsewhere, in this case it’s referring to “matrix.config.os” which is a variable defined on lines 13 through 15. Line 7 is telling the Github Action to run on the Github runner “windows-latest”. That means that you’re choosing which virtual environment to run your commands on, in this case it means our R script or Rmarkdown file will run on that environment. You can choose from several options such as different Mac, Ubuntu, and Windows environments. I suggest using what you run locally. The example I followed used an Ubuntu environment, and I initially just kept that as is until I realized it was giving me errors because I didn’t have a certain package defined in my Rmarkdown document that it needed to work on an Ubuntu system.
I’m not entirely sure of the purpose of the “name” entry on line 9, but I think all it does is set the name for the job for display somewhere on Github. In this case the name is set to show the operating system and the release of R used for the job.
Next up is lines 11 through 15. I don’t fully understand the purpose of the “strategy” section here. According to the Github documentation it’s one of the “contexts” available that can be used for different purposes. In this case I’m not sure if it’s really necessary, but within the strategy section several variables are defined for use elsewhere, such as the OS and R version. The “fail-fast” option seems to be something that could cancel all in-progress jobs if one of your matrix jobs fails. I don’t know what that means and as far as I can tell there isn’t a matrix job actually happening here, so I’m not sure if this section is really necessary but I left it in from the example I modified since it seems to work fine without removing it.

Onto line 17. The “env” portion is another context where certain variables are set. Some of these variables just seem to be what I’ll call “trust me” variables, as in “a bunch of examples do it this way so just trust that they’re right”. If you care about why or are suspicious they’re causing you trouble here’s some more info I found about each:
- R_REMOTES_NO_ERRORS_FROM_WARNINGS: If you’ve installed packages in R before you’ve probably seen some warnings pop up, this keeps those warnings from turning into errors that could mess up your Github Action.
- RSPM: RSPM seems to stand for “R Studio Package Manager”. I don’t think this line is necessary, but also it’s not hurting anything so I’m leaving it in. In other examples it seems to be calling a variable set under the matrix section, like we did with the OS. But the example I followed didn’t set an RSPM variable so I’m fairly sure it’s doing nothing, but I also haven’t tried to take it out. ¯\_(ツ)_/¯
- GITHUB_PAT: This line seems to work some Github Actions magic that I don’t know the reason for, other people say that it helps and to put it there so why not.
The variables on lines 21 through 24 are ones I created. You’ll see how I use them later on, but basically I’m just putting the path and filename I want up front so I can copy this workflow and change only those variables the next time I want to automate an R file. I don’t actually use the variables on lines 23 and 24, they’re commented out using “#”.
Line 26 begins the “steps” section. Actions run as steps, and in this section you can give each action a name and run that action. First it defines some of the tools it “uses”. That’s what’s happening on lines 27 and 29. Line 27 uses a tool that lets this workflow check out a repository and line 29 sets up the R environment for use in actions. Note that the “@master” portion seems to specify what branch of the “setup-r” tool we’re looking at, it’s kind of like a version signifier. The current version seems to be “v2”, but according to this thread since the branch was renamed from “master” and has eventually become “v2” Github automatically redirects from “master” to “v2”. So that’s why “master” still seems to work. It sounds like the proper naming might be “v2” but master seems to work fine. If you have trouble and trace it back to that being the source it might be good to try “v2” instead.
Lines 30 through 32 define some settings for the “setup-r” action. “With” means line 29 will use info provided on lines 31 and 32. Line 31 sets the version of R we want to use and references the variable previously defined under the matrix section on line 15. I’m just using “release”, which seems to default to the latest available version, but you can specify other versions if desired. Line 32 sets an “http-user-agent” setting used by the “r-setup” tool, but references a variable under the matrix section that we never defined, so I’m not sure if it’s actually doing anything but I’m leaving it in there in case it is.
Line 34 sets up Pandoc, which is something used to generate Rmarkdown output. If you want to know more about it this is a useful explanation.
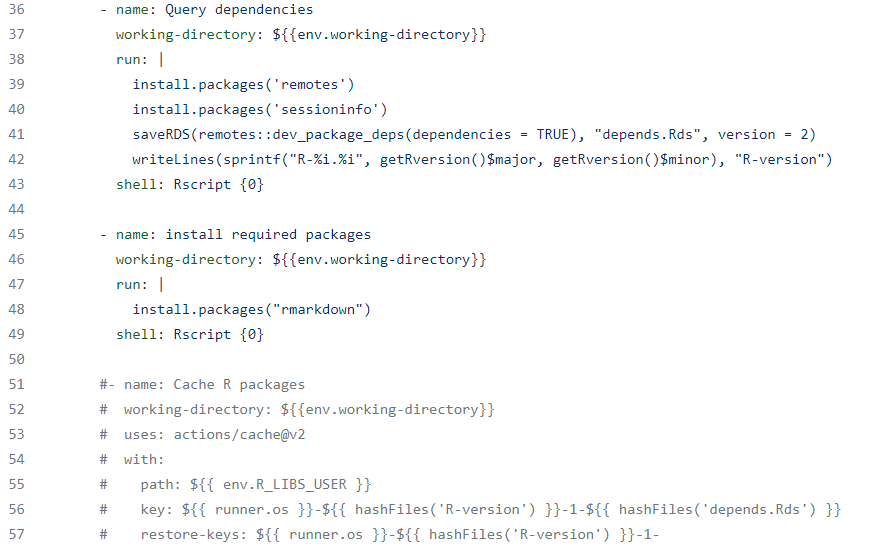
Finally we’re getting to the interesting stuff. Line 36 is our first named step that will start doing something useful. I mostly just left the names as-is from the example I followed. In this case we’re querying dependencies, which means looking at what packages our R file needs. First this step gets a name on line 36. Then we define the working directory. This line references the variable in the “env” section we set. We want to set the working directory to the folder of our R package. In my example my R package is called “FluPackage”, so I set the working directory to “./forecasting/FluPackage”.
When we’re defining paths and directories, it’s important to know how to start them. The “./” at the beginning means we’re starting in the current working directory. For our Github action that means we’re starting in the root directory of our repository. That’s where we want to start, but I use other starting locations elsewhere so we’ll want to know what they mean. Based on this resource here’s the important ones to know:
- ”/” = root directory (top level of all your folders)
- ”./” = current working directory
- ”../” = parent directory (one folder up from the current working directory)
On line 38 we enter the run command which tells our action to execute commands. The | after “run:” just means there are multiple lines to this run command and tells it to look at the lines below. Something important to know is that the “shell: Rscript {0}” on line 43 tells this step what shell to use. I don’t fully understand it, but my impression is that the different shells are just the core computer languages you can choose from. Specifically, line 43 is using a command to specify a custom shell for R files. That’s all we need to know, since we setup the R environment in previous commands it’ll recognize that we want to run R commands.
The actual contents of this step on lines 39 through 40 are just installing two packages that are needed. Those lines are important. The lines 41 and 42 aren’t really being used. What they’re doing is using some R commands to look at the dependencies in our package (based on the DESCRIPTION file) and writing them to a “depends.Rds” file that can be referenced later. But this file only gets used in the “Cache R Packages” step on lines 51 through 57, which I’ve commented out because I wasn’t able to get it working and it’s not critical unless you really care about how long your Github Action is taking to run. If you do care about that you’ll have to do some more digging because I couldn’t figure it out, I suggest starting with this article that I started from, he succeeds at getting his packages to cache.
I’m keeping lines 41 and 42 in because I don’t want to accidentally break anything if I take them out, and I want them there in case I decide to try to fix the caching section someday. But lines 39 and 40 are important, they’re packages that do get used later, so if you tweak stuff don’t delete those. You can see where packages have been used when you see the name of the package followed by “::”, such as “remotes::dev_package…” on line 41.
Lines 45 through 49 constitute the next step, where we install another package we need, the “rmarkdown” package. If you aren’t using Rmarkdown files for this you probably don’t need that installed, and some of the later steps may need modified since you won’t actually be rendering an .Rmd files.
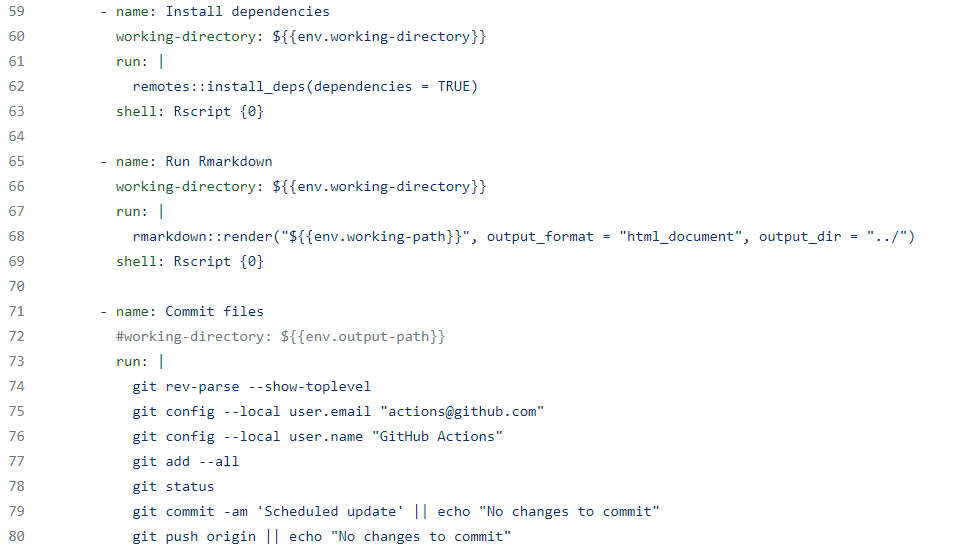
Next on lines 59 through 63 we install dependencies. This section will look in our working directory, find the package there, and look in the DESCRIPTION file to see which dependencies are there. It does that on line 62, where it uses the “remotes” package to look for and install these dependencies. Again, the working directory on line 60 should point to our package so that the install dependencies command is looking in the correct place.
Lines 65 through 69 are where the Rmarkdown file in the package actually gets rendered. I set the working directory to the package location, then it runs the render command and I specify the necessary inputs to that command. First I specify the file to be rendered. On line 22 I had set that as “R/Flu_Hospitalizations.rmd”. The working directory is already set to the package, so all this is doing is say go to the file in the “R” folder in the package. Then I specify that I want the output to be html, and that I want the output directory to be in the parent directory, which means one folder above the working directory. You may have to adjust these if you want it to output elsewhere.
Lines 71 through 80 commit the files. When the files are run and output is created the output needs to be committed to appear in your Github repository. Initially my strategy here was to commit the specific output file by name, but that didn’t seem to be working so I just made it commit all the files. Because it’s just committing everything I commented out the working directory, since I believe this will commit everything in my repository that needs committed regardless of where it is. Line 74 is just a command to output the top level of the “working tree”. I don’t fully understand what a working tree is, but basically it just outputs what the current working tree is so that I could check and make sure I was operating in the right place when I was having issues committing my files, but ultimately it didn’t end up being all that useful. Lines 75 and 76 were in the example I followed, and I believe they basically just create a bot that will do the committing. Not sure exactly, but I suggest leaving them as-is.
Line 77 adds all files with changes to the “staging area”. There are different add commands as described in detail here, but the “–all” just adds everything with changes. The staging area basically means stuff that’s ready to be committed. Line 78 will just output the status, which means it’ll show what the status of the uncommitted files is in the working directory and staging area.
Line 79 commits the changes. The output files should now show up in the repository. The “-am” is a combination of “-a” and “-m”. The “a” essentially means all and the “m” means message, which means it’ll make “Scheduled Update” appear as the message in Github. The “||” was hard to figure out at first because Google isn’t the best with symbols, but this is called a “double pipe” and basically means “OR”. Commit the files OR if there’s nothing to commit output (I believe that’s what “echo” means) “No changes to commit”.
Line 80 pushes the commit to the remote server. That’s kind of gibberish to me, but I think (based on a handy explanation here) it means that the files we’ve committed have been committed on the virtual environment we created (the “windows-server” or whatever), but still need to be pushed to Github itself. The “origin” part of this is confusing to me, but it has something to do with Github branches. And again, if there’s nothing to push we get the echo output “No changes to commit”.

Finally, the last step starting on line 82 just creates some session info logging for us. Not entirely sure how it works and I don’t think I’ve really used it, but might be helpful for anyone trying to troubleshoot stuff.
Monitoring and Troubleshooting
That’s pretty much the breakdown of the Github actions. The last useful thing to know is that Github logs each step of your action as it executes, and you can look through that to see where things went wrong. The top menu on Github has an “Actions” tab that you can look at to see the status of your actions.

You can see your workflows there, and if you click on one of the completed workflows you see this:
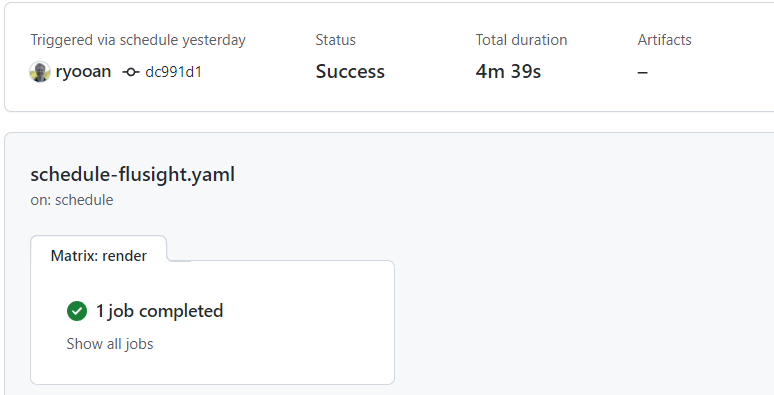
You can click on “1 job completed” and then again on the name of the virtual environment it ran in and you’ll see this:
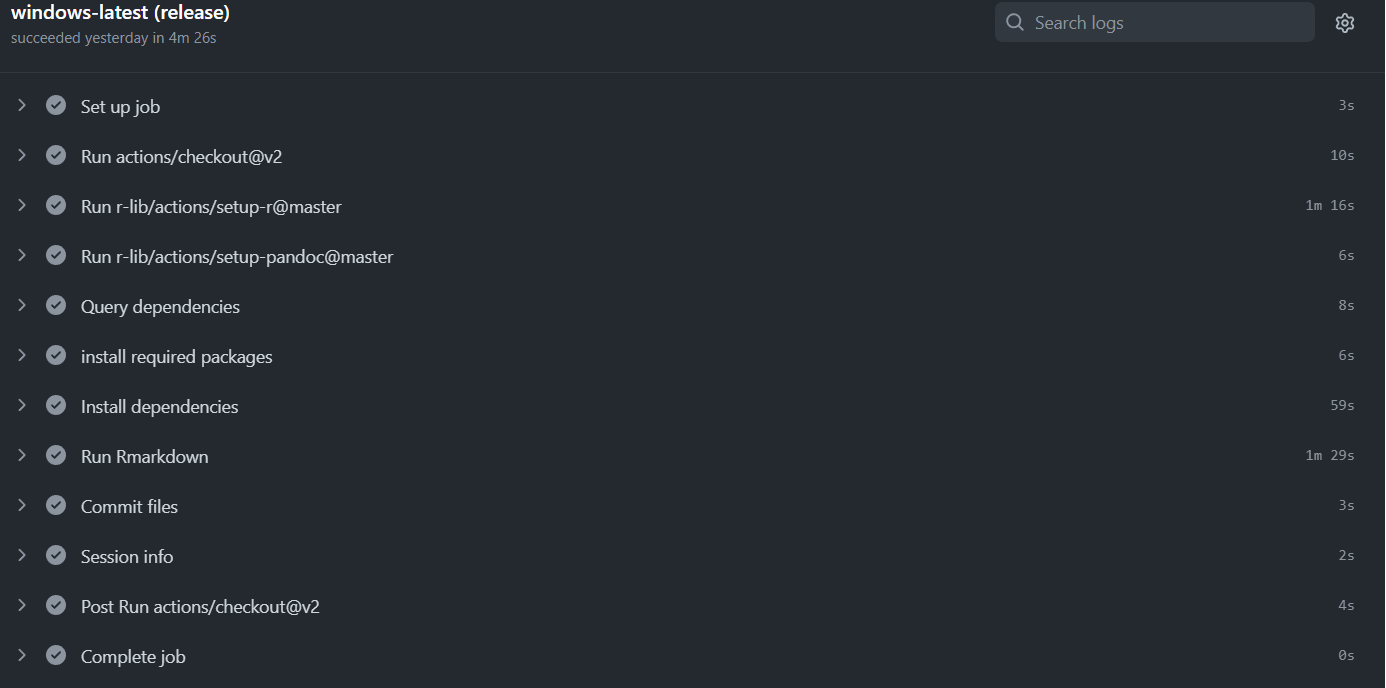
You can expand each step and see a log of what happened. If your Github action failed you can check out the first one that shows up with a red X and try to diagnose why from that. If you’re having trouble I suggest making changes and then setting a cron schedule to run the action every 10 minutes so the action will trigger again soon and you can see if your changes have managed to fix things.
Okay Bye
That’s pretty much everything I’ve managed to figure out when trying to make a working Github Action. So far it’s been successful, I have two Github Actions in my “workflows” folder and they run without errors once per day on their own. If you’ve made it this far I hope this has helped you!